

Studio Setup
- Aug 7, 2019
- 24 min read
Updated: May 23, 2024

Intro
Since graduating in 2018 I have been busy transforming (renovating and conserving) an outbuilding on a daily basis on my grandmother's land into a Studio which I will use primarily for producing Contextual Glass Artwork and Decorative Ceramic ware.
Every artist's studio is set up differently relating to their area of specialism. As such, I have found it particularly hard when researching my options, made even more difficult by the type of building, space available, and being on the edge of a conservation zone.
I am both passionate about maintaining the history and character of buildings, using traditional or sympathetic methods of construction, and making the best use of space available.
I thought I'd share information about my set up in the hope that it may offer some solutions or information to those in a similar position. As such I will keep adding to this blog over time.
It is worth noting that in the short term it would've been far cheaper in renting studio space or hiring kilns and other equipment elsewhere (if easily accessible), as opposed to spending my life savings setting up my own studio. After having a hard time at university, especially in the final year, and losing relatives, I chose to be close to my remaining small family on a daily basis by renovating a relatively unused building and work in a much more relaxing environment. I have chosen to view this as investing in my own future and it partly takes the pressure off having to produce a vast number of items per month in order to just pay the rent, hence I can afford time to continue different practices and enjoy my work hopefully at a more steady pace than the 12 hour days I put in at university to make the most of the facilities there.
The Details
The building in question is made from part brick and part stone walls (banana shaped) with a pan tiled roof and internal brick floor. Whilst the roof was relatively watertight it was not weatherproof. Pan tiles are unglazed and overlapped to partially repel rain but also absorb the rain and when saturated, the rain can seep through to the surface below. Also every time the wind blew, cobwebs and 100 years+ of dirt would fall below. For anyone working with glass (especially) and also ceramics this is not ideal and so I decided to re-roof the building to control my immediate environment.
It has taken over 6 months of Summer 2018 to sort out mainly junk stored in the outbuilding and clean it before other work could be started.


After much research online and contacting companies that deal with restoration, I had the roof replaced. This itself was a nightmare as I could find no-one willing to do it for a reasonable price but in the end came across some builders quite by chance and agreed a figure for all the works with myself sourcing and supplying the materials in line with my research into building conservation.
Roofing / beams
The original pan tiles were stripped off and put aside, rafters inspected, Roofshield breather membrane attached and new battens installed with the original pan tiles replaced. A mix of white cement and lime mortar was used to fix the ridge tiles in place.
The job was done over a few weeks in the summer of 2019.
The inner tie beams are being left exposed to maintain the character of the building apart from where wood rot and wood worm have reduced some to un-salvageable condition and have had to be cut out.
I also treated the beams with anti-woodworm treatment and wood hardener to maintain the other beams.


Update:
After experiencing leaking and mould growth in 2023 following some heavy periods of rain, I had to get roofers in to inspect and provide a cost for this work.
The original builders hadn't fitted adequate drip edges. These protect the roof from wind driving rain underneath the membrane and also stop birds from nesting in the pan tiles / membrane. I also had to have a dry verge fitted in place of the gable end and have flashing fitted around the chimney stack as the previous mix was cracking.
Overhead storage space
I partially replaced some rotten joists supporting floorboards for a raised area above one of the smaller rooms by rebating and rejoining some new joists to support these and mortaring up loose bricks. Whilst I was originally planning to buy reclaimed floorboards and use them with the original ones this was not possible due to difference in size and was a more expensive option than I had expected. I decided to rip out the old boards and opted to replace them with structural plywood for a flat even surface. I then fitted some vinyl resembling old oak flooring on top so I can easily keep the area clean. I intend to use this space for additional storage of materials etc. This also meant removing the slats and plaster beneath the boards and old insulation (straw and newspaper) but made sense as I was also removing degraded plaster from the walls (see lower down).


Insulation
I chose a traditional insulation to maintain the breathability of the building in league with the breathable membrane. This allows it to purify and neutralise the air from harmful substances like VOC compounds, chemicals and toxins. It regulates humidity and can absorb and release up to 33% of moisture without compromising its insulation ability. It is a good insulator and reduces sound.
One of the reasons I chose Thermafleece Cosywool rolls over a mineral wool such as Rockwool was that it's width was 37cm and the space between each rafter was between 30 and 34cm. Each roll being 13m long and 5cm in depth meant that although the cost of wool is more expensive it was easier to lay (not requiring slivers cutting unlike Rockwool) and better value and could just be friction fitted between the rafters and held in place using horizontal nails. To work all this out I modelled the studio and rafters using Rhino 3D (as well as planning my space in general).


Internal Boarding
I considered using a natural and breathable boarding for the inside roofing such as Savolit Plus Wood Wool board but in the end opted for plasterboard and vapour board (above my kilns). I wanted white board to both bounce light off and give a modern look that can be wiped down.
I spent weeks re-filling and taping seams and screw holes to improve the look of plaster boards as well as painting with modern white emulsion (considered breathable/partially breathable).
I also filled some gaps using fire retardant expandable foam. Despite some people on forums claiming that this can be dissolved (cleaned up) with acetone like polystyrene it cannot. It's better to wet the area you are applying, using a gun and cartridge rather than applying by hand and removing excess after the foam has dried using a knife / scraper.
As pictured the extra time spent filling has made all the difference visually.


Walls
The inside walls are being left stone and brick to maintain the character of the building. I have re-pointed with hydraulic lime in some areas. Alongside the main room I will be using as my studio are 2 other smaller rooms used by my gran for storage. I decided to chip off old failing plaster in one room that was deteriorating all over the floor (lengthening my workload) and plan to seal the remaining pointing using Namurian Water Shield as advised by Conserv.co.uk.


Lighting
I had 6 daylight low energy LED strip lights fitted along existing beams. These are highly efficient and the white painted ceiling helps to bounce the light off, brightening the space.


Windows
After making enquiries with the local council's conservation and planning officer, I was pleased to find out that because I was replacing the windows like-for-like in style, that they could be either wood or PVC. I opted to replace the rotten wooden windows (made from scraps of wood) with double-glazed PVC windows supplied by local window company Starglaze in a heritage colour of Chartwell Green with a faux-wood finish that suits old brick and stone properties alike. A new oak lintel was also purchased from a local wood yard where one had succumbed to rot. They have transformed the building with many locals commenting on the pleasant aesthetics. A single opening centre pivoting double glazed Velux roof light has also replaced glass pan tiles to provide natural light where my central workspace will be.


I also renovated the wooden doors by removing old paint using wallpaper scrapers and a heat gun, before applying filler, sanding the surface and repainting with Cuprinol Shades wood paint.
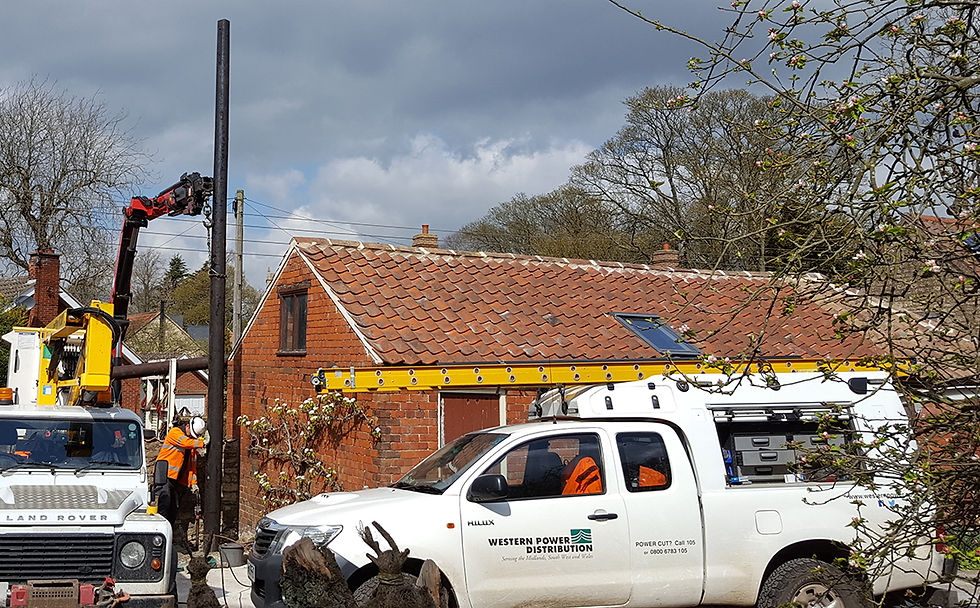
Electricity
I originally made enquiries with the local electricity distributors after my 1st year at university and knew that whilst 3-phase electricity would be preferable, due to the small old village in which my studio was situated, I would be limited to 1-phase. (3-phase essentially means that several powered equipment / machines can be used at the same time).
I didn't mind too much as the majority of the time I don't expect to be using much equipment at the same time and I can work around this with advanced planning.
Despite my research I was still surprised that the cost was approximately £3300 for connection of a cable. Also due to the height on the building, I was forced to have a wooden pole erected on our land and extra costs undertaken to install a meter box and trenching supplied and fitted by a local builder.
Another option (cheaper) would be to extend a line from my gran's house adjacent to the outbuilding to supply a small kiln. I decided against this as I didn't want my actions to affect my gran in any way and possibly trip her electricity supply etc. Also this would lead to a drop off in power that may not be enough to power a kiln.
I decided to go with Octopus energy as they are a cheap alternative to the big 6 and use 100% renewable energy sources. I had a smart meter fitted but can't read this as the power sockets are slightly too far from the fuse box. I instead use an energy plug to measure the cost in £ and energy of any powered devices/equipment used.
Water, trenching, and drainage
Using a local builder, I managed to fit several works in the same trench. I had electricity ducting fitted at the deepest depth. The water was extended from my gran's supply through the wall of the building. A new outside drain was connected to the existing waste pipe and the sink will link to this through the wall.
I am using a small water heater that will heat water when required and limit the water used by using a small spray nozzle, rather than using a heated water tank system to save on water and energy costs.

I had considered using a low-tech solution of a small sink with a storage tank fitted above (to be filled when needed) and another tank below. This could by wheeled out or have a hose fitted to empty waste whenever needed. Due to the other works needing trenching and my health conditions deteriorating (partly from lifting) I decided against this.
Flooring
Due to the unglazed brick floor being hard to keep clean and absorbing any water when washed, I intended to fit vinyl on top. It would also reduce the sound when I kneed clay on a wooden table, make it easy to wheel equipment about, and make it easier to mop the floor and clean up any glass and ceramic dust which if inhaled would be bad for health.
This was the start of an absolute nightmare that alongside weather, flooding and health issues vastly delayed the project. In order to level the floor I used latex levelling compound. Not realising this was cement based I covered the entire floor with it (24m2) which worked well until we had a lot of rain. Although the studio itself wasn't flooded, it was built before damp proof membranes needed to be used in buildings, it was built directly onto the ground and the bricks were used to provide a sub-floor, meaning that as long as they were left exposed any wet would eventually evaporate. As such the water got trapped in the levelling compound and would not evaporate. After a few months of it not drying using a variety of equipment, I consulted a restoration company who confirmed what I hoped could be avoided, that the entire compound had to be removed. This was messy and the only way I found worked was using a brick hammer to crack the surface and remove every last bit.


After further consulting the same firm I was advised that in order to fit vinyl a raised floor would be needed so that the brick sub-floor could still breathe. I chose to make this myself using wooden joists suspended on individually adjustable hard-wearing plastic feet to compensate for the still uneven bricks.
Prior to this I spent time levelling the kilns (2 penny coins and metal washers are good for this) as they would sit on the brick floor since it's inflammable.
I also fitted a breathable geo-textile membrane to still maintain breathability yet provide a layer of added protection for the raised wooden sub-floor. The joists were treated to protect them from rot, wood worm, and to waterproof them using Ronseal Wood Preserver.
After levelling with a spirit-level in 1 direction I fitted the chipboard crossing this and re-levelled. This generally went quickly apart from having to cut boards to get a closer fit to the un-square stone walls. I built a wide ramp next to the doors to make it easier to access and load/unload materials and equipment. I used hinges for the ramp so that if I need to allow for more air transfer to the sub-floor I can always prop up the ramp and leave the doors open, although now the levelling compound is removed I doubt I will have the need to do this. This is the last structural issue for the building which is a relief since it is now mid-May 2020 and approx 2 years since I started the project. Next will come fitting the remaining equipment I have already bought and sourcing remaining smaller fixtures before I can begin work...after a much earned rest. I also badly injured my shoulders lifting the heavy chipboard panels which I am still struggling with today and receiving physio for and this has caused some delays.


I fitted vinyl resembling the same old oak planks fitted to my overhead storage space.
2024 update: Despite having a lot of tables and various machinery on it, the floor is still flat, solid, and easy to clean.
Sink
I bought a 120cm2 sink that is big enough for me to manually cold work glass (on a glass sheet using grits) and is big enough to fit big pieces in to polish pieces using wet power tools. I had a brass outdoor tap fitted inside (connected underground to the main house water supply) and I can fit a hose to it to help rinse pieces down. I also had a small hot water heater fitted so I don't freeze to death as the building will remain unheated to save on costs and energy, and despite the added insulation it is still very cold.

Underneath the sink I have fitted a sump to collect any plaster / clay to stop it going down the drain, preventing any clogging and stopping any water pollution. This has been made out of a plastic storage box, connected to the waste using a tank connector. It is on a platform with wheels so after disconnecting it from the waste I can pull it out (plugging the tank connector with a sponge to prevent the water leaking). I can then pour the excess water down the drain and collect the clay and plaster for disposal. There is another container within the main plastic box with small holes in 3" from the base. This allows water to drain through to the waste but does not allow lumps of clay or plaster to. These settle at the bottom where they can be emptied - usually once per year.
The downside is because of my sink sitting low with flooring built around it it's very hard to access, especially with shoulder injuries. I may look into changing this in the future.


Cold-working glass (by hand and machine)
For cold-working I considered using an air compressor, air powered angle grinder and abrasive discs to cold work pieces in the sink. I also originally thought about wheeling the sink outdoors in the summer months to reduce mess but have since abandoned this idea.
I bought a FLEX electrically powered angle grinder (110V) powered by a 230V-110V transformer and polishing discs as these are less noisy than running air powered tools and a compressor. The down-side is they are heavy to wield and more expensive.
I also suffer from Pulsatile Tinnitus in my right ear - (not caused by noise as I have always protected my hearing). PT has deeply affected my life, following on from uni and building project stress and has taken approx 3 years to even start to settle down and this still cripples me on a day-to-day basis, affecting sleep and also affecting my Fibromyalgia.
A grinder and discs will allow a variation in sizes and shapes to be cold worked (grinded and polished) to achieve different surface finishes.


I have been looking for over 5 years for polishing buffer wheel machines and linishers, even considering making my own. It's worth noting that you can't just pick up a piece of equipment made for another use or material (even bench grinders) as they won't normally run at the right speed or have enough torque when you're grinding/polishing glass.
I acquired a heavy duty motorised polishing wheel and a large and heavy wet linisher from a retiring Notts. glassblower in 03/2021. This has come with its own set of problems as the units are
3 phase and I only have 1 phase electricity.
Three options are available to solve this problem - 3ph to 1ph power converters, power inverters, or the more expensive option of rotary converters.
After extensive research I have to use a rotary converter (yet to purchase) for approx £1200 and also have the cost of getting this fitted by a electrician. It's worth enquiring with the manufacturers before buying any equipment as I came across some woodworkers who could use industrial 3ph powered machines on a 1 ph supply only using a much cheaper power converter, however I was informed that because my machines are unlikely to reach full speed within 1 second that power converters will not work.
Inverters also require a separate inverter for each piece of machinery and are hard-wired in. From what I understand, a rotary converter essentially works by powering a motor which reaches full speed before passing the power onto the equipment plugged in. This will also require a change on my equipment from 3ph 4-pin plugs to 5-pin plugs, however it's easier to just plug in each piece of equipment as and when I need it.
The machines were in good working order but suffered from a lot of rust. I have renovated these by grinding off flaking rust with an angle grinder and wire brush, repairing holes using epoxy welding compound, and painting them using metal skip paint from Nottingham based PremiumPaints.co.uk (in a lovely industrial orange colour) to protect them from water.
I will be wetting the polishing wheel (cork) manually and using pumice and cerium polishing powder. I will supply the linisher directly from my tap via a hosepipe. I will fit drainage via plumbing pipe below the raised floor to my drain outside the main doors, cutting a hole through the door.
It's important not to recycle the water running onto the linishers' belt to reduces the risk of contaminating between different belt grades/grits that could lead to scratching glass, otherwise a pump could be used to supply water to the linisher etc.
I also purchased a convex diamond wheel for grinding glass and a wet saw (equipped with diamond cutting wheels) for removing sprues and wells from cast glass. Again the heavily rusted wet saw (heavily caked in glass deposits) has been thoroughly cleaned by myself, grinded and painted and I will be levelling the tank/bed using epoxy resin to further waterproof it as it's heavily rusted with some holes. I plan on thoroughly cleaning the equipment after each use to help maintain it.


2024 update: I have yet to use any of this equipment. This is partly due to the 3ph issue, along with the fact that I'm not casting much glass in favour of submitting digital proposals and renders for competitions instead of making pieces.
Instead I choose to manually hand-coldwork pieces using diamond pads and files. This is fine for edge grinding on sheet glass such as jewellery or my landscape, flower and birds work.
I still mainly grind glass edges (of sheets) using hand-held diamond pads and diamond files as I don't see the need for powered equipment. I cold worked my glass work 'Trees, Lungs of the Earth' using only diamond pads and cerium on a felt pad.

Another option which I decided to pursue was buying a wheel for my ceramics work and modifying it by fitting large abrasive diamond wheels to the ceramic wheel head via a wooden batt to grind glass flat.
I managed to eventually source ones large enough (48cm) for me to make medium sized works (without a central arbor hole as this would mean using only half the wheel space). As such I had to replace the plastic bowl that came with the wheel with a wide and shallow enough bowl. I attached this using bolts and used rubber washers and silicone to waterproof it. I also used a fishing rod tube and the 2 end caps to waterproof the spindle attaching the wheel head to the motor. I used Plasticine to create a well and resin to attach this to the bowl (see picture 4).
Since the pottery wheel head is aluminium, I couldn't use magnetic diamond discs and these are much too expensive. Instead I bought non magnetic discs from China and planned to attach them to the wheel similar to a batt system used on pottery wheels when throwing clay vessels.
The diamond discs are glued using high shear strength (horizontally strong) glue to a plywood cut circle.
The plywood has holes cut so that it slots on top of the wheel head using removable bolts.
Holes were drilled into the aluminium wheel head and bolts placed in them. These themselves can be removed or stay in place for use with batts when throwing clay on the pottery wheel. They can be fixed in place using wing nuts.
I planned to use a small electrical pump to supply water via a tube to the wheel head to keep friction down and stop wear on the diamond wheels. I also cut a hole and applied silicone and washers to fit a water-butt connector kit to use for drainage of water and glass waste into a bucket.
Other people have made smaller wheels (30cm) for grinding glaze from the bottom of ceramic pots so it will come in use for that if nothing else.
Glass grinders tend to cost a minimum of £5000 so I think it's worth the risk. Luckily I ordered my diamond discs from China and picked up my second-hand wheel from Chelmsford before all the Coronavirus crisis started.
This modification has made it harder to throw on the wheel as you cannot sit with your arms horizontally and it's harder to see the shape of the pot being thrown. I have kept the original pan that was supplied with the wheel so can always revert the wheels' set up back to the original if need be.


I tried to use this method with one of my glass works and whilst it did help level the base there is no comparison between this and a flat lap machine or reciprolap. It's more a case of fighting the spinning action and friction by hanging onto the glass.
After converting the machine back to pottery use (05/2024) the foot pedal has developed a crack. I plan to try and create a replacement using steel box and plate.
Working with powder
Due to my concerns about working with powder (plaster and a refractory material) and trying to create multi-usable equipment to save on space in the studio, I purchased a 1000L IBC water container that I was going to fit this on top of my sink (as it had similar dimensions) to use this as a powder booth. Since moving the sink inside and testing this theory I have instead decided to build a wooden frame and use 0.5mm PVC/oil-cloth to create a powder booth. This fits better and is slightly taller so I don't have to stoop so much whilst using it as I would have with the IBC container.
I purchased an H-Class extractor that uses both filters and water to trap harmful sized particles and contain them for easier disposal and may also mean I am able to reuse this material.
IBC containers can be reused to create shielding around power tools to help keep any mess contained. They would also make great sinks (sat on top of their protective cage) for washing any printing screens in and have drainage from the top or a side tap.
2024 update: In the end I didn't use the IBC tank and my frame alongside heavy duty plastic sheeting with removable plastic (abatoir-like) strips works great both for containing water or any plaster dust. I also wear an FFP3 respirator.


Kilns
I have purchased 2 used kilns off ebay approx 95L for a top loader (for ceramics) and 180L for a front loader (for glass/ceramics) and a new flatbed Nabertherm kiln for glass (casting and fusing). Though only one can be fired at a time, potentially they can be loaded and switched on after each has finished firing and is cooling to room temperature, or can be used to produce different shapes and sized pieces.
The used ones appear to be in good condition with no flaking elements and good condition (uncracked) bricks. Obviously time will tell and I planned to buy a new controller for the two used kilns to share so they could be used in glass casting as they came with ceramics only firing options i.e. no cool down to anneal glass. I have yet to upgrade the controllers and may just keep the top loader for ceramics.
Each of the kilns has a breaker fitted and is far enough away that it won't be affected by heat. Most kilns should be between 30-50cm away from each other and surfaces/walls with 1m clearance above.
The front and top loader kilns allow for different work to be loaded easier. The kilns shelves are heavy and therefore hard to lift in sideways in the front loader and equally hard to lift in from the top on the top loader. I use a tile system (bought off ebay) to help fit more work in my kilns and only fire them when they are full to be both economical and sustainable.
In order to get the top loader kiln with castors (pictured) off the pallet I had to build a ramp from a wooden board on a rolled up carpet and pushed it off and on to the floor. As with all used kilns, the main issue is getting them delivered or finding ways to unload them from vans when you are on your own and without the use of pallet trucks.
I am interested in experimenting with Raku firing. Kilns can be built using a wire cage or oil drum with ceramic fibre and powered by propane gas. It is a far cheaper way of firing than buying a specialised Raku kiln and there are other firing methods that are equally cheap.
Alternatively I could use my electric top loader and just use a bin filled with sawdust to reduce the amount of oxygen to the piece outside. You won't be able to get the same reds as you can when using gas but I can't bring myself to use gas due to sustainability issues with burning natural gas.
I decided to buy an electric kiln as I intend on doing more than just Raku and like to have as much control as I can (using digital controllers), as well as firing indoors all year round without being affected by the weather.
It's also possible to buy oil barrel Raku kilns for approx £400 which often include the chamber (kiln), heat resistant gloves, a basic firing hose to connect to a gas cylinder, tongs, and shade 5 welders goggles. Additional options that may be fitted are a more advanced hose with additional safety, pyrometers and even digital temperature gauges. Home-made Raku kilns can be have vertical access with lids removed for top access. The kilns themselves can also be lifted vertically to provide access to pots underneath, or they can be horizontal similar to a barbecue. Like with all kilns, no one kiln can cover all shapes and sizes of pottery/works.


Heat/Fume management
One of my biggest headaches was trying to get advice on how to manage excess heat or fumes from kilns in the studio. It seems to be a general consensus to not bother venting heat or fumes from kilns but after spending all the money renovating the studio and since I planned to be working in the studio day and night whilst firing the kilns, I didn't want to be affected by fumes or to have excess moisture damaging the fabric of the building. I looked at ways of using vertical stainless steel piping from extraction hoods to vent through the roof but due to the pan tiles and breathable membrane this seemed inadvisable. In fact no-one would advise due to venting at temperatures between 0-500°C and no roof seals made seemed to be able to withstand this sort of heat.
In the end I replaced the existing wooden windows with PVC ones which open that allowed some ventilation along with the Velux window in the roof. You could combine this with an industrial 8" plug in fan to blow (suck) fumes out of a window nearby using a hoze if need be. This is still a pain to work out since all the kilns are of different heights and dimensions and there is just enough room above the kilns to allow some cooling before custom made hoods and a fan can move the air.
A cheaper option for say a single kiln or two of the same kind is to fit a used/reduced price kitchen cooker hood. It is also possible to use a core drill and create a hole in the wall to direct fumes outside but for me wasn't really possible due to access.
A lot of the information available online is relating to downdraft kilns. Since neither of my kilns are set up like this I didn't want to sacrifice them by drilling holes in the base. The Orton Updraft and Downdraft kits are not readily available in the UK but similar systems could be built.


I haven't found the need for venting much beyond opening a window so far as have not fired the ceramic kilns much (bisque firing only hence no glazes used). Also the glass kiln has vents on the front and does not heat the space at all. The pitched roof helps take rising heat away and I've also been firing over night for approx 12 hours only. The above pictures shows possible solutions.
2024 update: I have continued to not fire many glazes and certainly nothing toxic or requiring venting. I would go with the general consensus that unless you have space to fit a cooker hob extraction fan system above a kiln or use a lot of glazes with toxic elements to not bother with venting.
Storage
Boltless shelving approx £25 each and storage bins will be used to store some materials. Due to limited wall space I will be relying on these and the raised storage area above one of the smaller rooms (accessible via a ladder). Since acquiring the linisher I have changed storage in the main room to move ceramic materials into one of the smaller rooms. I have moved the clay (garden storage) bin into here which keeps it nice and cool (and wet).
2024 update: After struggling with space, I've added height adjustable shelves to use with green mdf wooden shelves to cater for the drying of different sized pieces. I've also added approx 4 meters worth of shelving above the kilns. This will be used to store work that needs drying before firing, or work that has been fired, as well as some equipment. Whilst it's not normally recommended to put things close to the kilns, there is enough space away from the top vents of the kilns.
I've also added additional shelving to the window on the roadside of my studio.
I plan to further modify my galvanised shelving units by making a sloped rack system on which to store containers of bullseye glass. Currently containers are stacked on top of each other and hard to access.


Other equipment
LIDL's range of Parkside equipment offers a cheaper alternative to other brands. Their Mortar Mixer is a heavier duty version of a glaze mixing head (for a drill), or a much more expensive commercial glaze mixer (for use with big 50L tubs). I used it for mixing a fine plaster filler to fill gaps in-between plasterboards but it could be useful for mixing glaze batches. It's always good to think outside the box and use things for more than their intended purpose. A drill powered whisk can also be used for glaze mixing or use with plaster. Personally I prefer to mix plaster by hand to make sure there is not trapped pockets of material and this works well. Gloves can always be worn to prevent drying skin out too much and should always be used when handling glaze materials, alongside goggles and an FFP3 mask.
I managed to pick up a Gladstone wall mounted clay extruder off ebay.
I bought x2 wooden unvarnished kitchen island units that I use as work benches in the studio and these are great for use with clay, drying it out when kneading and rolling it and providing a good amount of room for glass projects also. They have some shelf storage on one side and space for plastic waste bins on the other (containing powdered plaster etc).
I also picked up a Gladstone freestanding slab roller.
Other things I may consider obtaining in the future (depending upon ease of use manually or regularity of my needs) are:
sand blaster, although I have ran out of room...
Recycling clay
Though cold, the studio maintains a good constant temperature so that clay doesn't dry out too quickly. This is generally a good thing as I can work longer with clay and if I need to dry it out a heat gun can help.
It also mean that when recycling clay (by slaking it in buckets of water), this keeps for several weeks without developing mold. (Mold is not a problem and 1 drop of bleach can sort this out but some people worry as it can look unsightly).
Normally I keep it until I have enough to process. I do this by pouring off the excess water and scooping the clay out into a plaster bowl mould and leaving this for 1-2 days, or leaving it out in the sun in good weather. I put a bucket over the top to help it dry out slow. The mould absorbs the water and when it reaches the right consistency I knead it and bag it. I keep a bucket by my pottery wheel and can drain both the pottery bowl and also put any scraps of dry clay in it. If anything I seem to have recycled clay more than doing anything else. I also empty the sump from under the sink on occasion. Some people have recommended sieving scrap buckets in case other material / clay tools end up in them by accident. Due to the cold temperature of the studio I do have to keep an eye on mold developing on my plaster bowl mould after drying clay in it and wipe this off and dry them outside in the sun where possible.
The photo below detail the process.
Mixing using drill attachment in bucket.
Pouring into plaster moulds/plaster batts.
Plaster dried and lifting from surface.
Clay turned to dry other side before being kneaded, bagged, and stored.


Update
Most studio work was completed November 2020 and I started producing some small glass ornaments for family. In late 2020 the room temperature reached 3-8 degrees Celcius so prevented the glass kiln from firing which requires at least 6 degrees C. In April 2021 it was 11 degrees C and wearing a top and apron with occasionally using a fan heater meant the studio was largely warm enough to work in.
I have just started a ceramics project (04/2021) which I have high hopes for and the studio set up is working well.
I have since changed (2024) to using a medium-wave IR heater on a stand that plugs into the mains. This is very efficient and is an immediate source of heat used in the winter months, heating myself directly, as opposed to the air around me. The studio is a lot fuller than these photos from 2002?


